Azure Functions are serverless compute that help orchestrate and automate complex problems in an event-driven way. We can choose any supported language to create and deploy an Azure Function in the cloud. The supported language as of date is C#, Java, Python, JavaScript, F#, Powershell, and TypeScript. This post will learn how we can create an Azure function in Java using IntelliJ IDEA IDE. We will be using IntelliJ IDEA’s community edition (available free).
Set up IntelliJ IDEA IDE for Azure Function development
To create, execute, and test the Azure function apps on our local machine, we need to download and install IntelliJ IDEA from this link. Once, the download is complete, we can open the application executable and then follow the on-screen instructions to install the IntelliJ IDEA IDE locally. Now, if you want to be more familiar with this IDE, the below posts can help you to be more familiar with this IDE:
- For maven, Create a scala maven project using IntelliJ IDEA – Step by step
- For Scala, Create scala sbt project using IntelliJ IDEA – Step by step
- Create jar in IntelliJ IDEA for Maven-based Scala + Spark project
- Create jar in IntelliJ IDEA for sbt-based Scala + Spark project
Now, that we have IntelliJ installed on the local machine, we can open it and then follow these steps. The steps are executed on MacOS but this should work on other OS with very small or with no changes.
1) Install Azure Toolkit for IntelliJ IDEA
First, we need to install the Azure toolkit plugin for IntelliJ IDEA. To install this plugin that enables Azure function development:
- On macOS IntelliJ -> Preferences -> Plugins, on Windows IntelliJ -> Settings -> Plugins.
- We get the below dialog box when we click on the Plugins tab on the left. In this dialog box, go to the marketplace and search for Azure. Click on the install button of “Azure Toolkit for IntelliJ“. This step may take a few minutes and may ask to restart the IDE.

- This will install the Azure development toolkit in IntelliJ.
2) Create an Azure Function in Java using IntelliJ
Once we have installed the Azure toolkit plugin, we will get the Azure Explorer tab on the left of the window of IntelliJ.

We can sign in to our Azure account. It helps us to deploy the Azure functions from the local machine to the Azure account directly. To sign in, we can right-click on the Azure button and choose the sign-in options. In this demo, we are using the Outh2.0 option. This redirects to the browser and asks for an Azure credential. Once, we log in successfully in the browser, the IDE gets linked with the given azure account. We get a message in the browser “Authentication complete. You can close the browser and return to the application.“.

Now, we can start creating our first Java Azure Function. To do so, go to File -> New Project.

Click on the “Azure Functions” on the left and Project SDK on the right side. Also, choose functions trigger as “HTTP Trigger” that we are using in this demo.

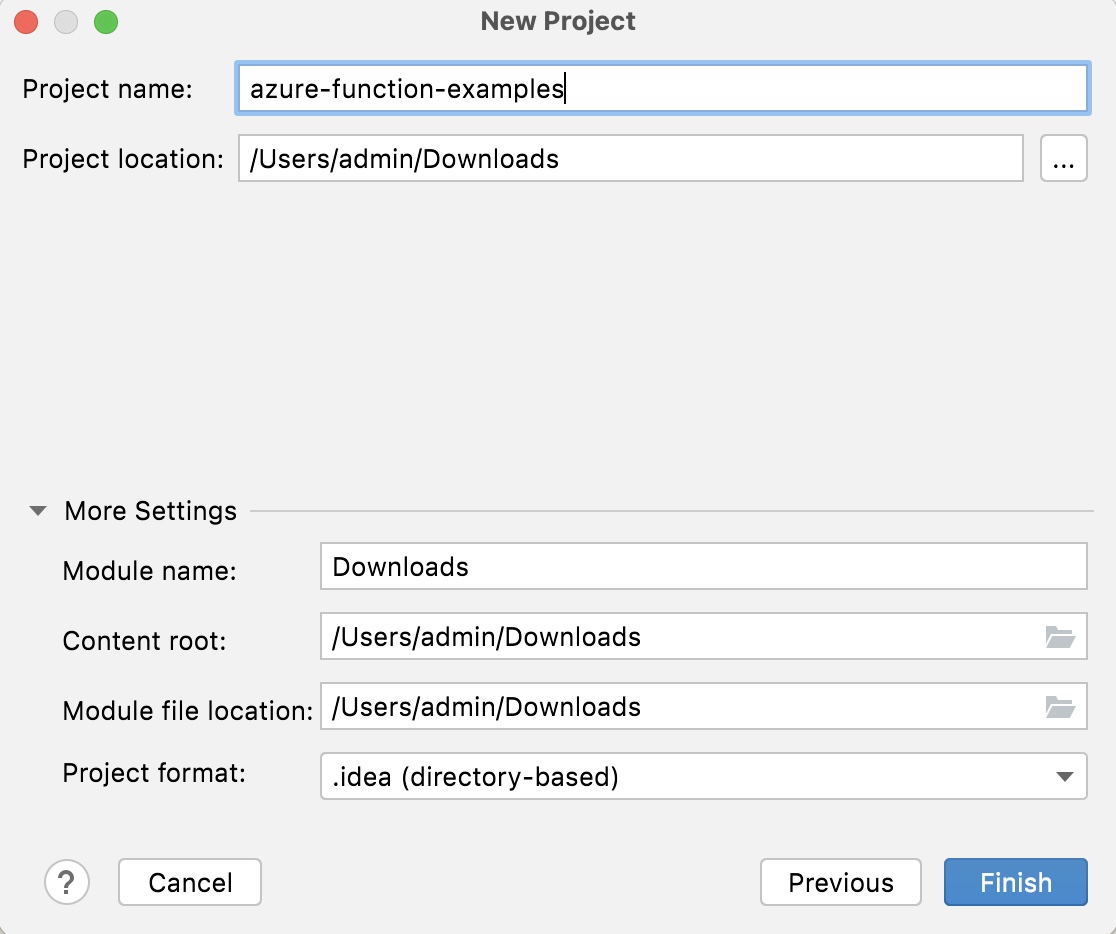
Next, provide the below values on the next screen.

Now, provide the project name and location as below and then click on the Finish button.
This will create a Java-based sample Azure Function project that gets triggered with the HTTP call.

3) Run and verify the azure Function locally
Now that we have set up the Java-based Azure project in IntelliJ, we can run this project and test it. To run this, click on the play button on the left of the HttpResponseMessage.
public HttpResponseMessage run(
            @HttpTrigger(
                name = "req",
                methods = {HttpMethod.GET, HttpMethod.POST},
                authLevel = AuthorizationLevel.ANONYMOUS)
                HttpRequestMessage<Optional<String>> request,
            final ExecutionContext context) {
        context.getLogger().info("Java HTTP trigger processed a request.");

This will build the project and then start the HTTP application and then we can use the mentioned HTTP host and port details to hit the API. If you get an error message like “Failed to get version of function(null)“. Follow the instructions mentioned at this link for the OS you are using.

Now, to verify this, go to your browser and type the mentioned URL by adding the query string to pass your name. It will show the greeting message as below.
http://localhost:59520/api/HttpExample/?name=Your Name Here
This will output as below:
Hello, Your Name Here
4) Deploy the Azure function to the portal
Finally, to deploy this function to Azure, we can deploy this project to the Azure cloud. To do so, right-click on the project -> Azure -> Deploy to Azure Functions.

Thanks for the reading. Please share your inputs in the comment section.
