Just like the Maven build tool, sbt is another tool that can be used to manage the project development lifecycle. It helps us to build, test, and package the Scala and Java-based projects into a .jar file. This jar file can be used as a package in another application/project, or it can be simply used to execute some data processing processes on a Hadoop cluster. In this post, we will learn how we can create a jar file in IntelliJ IDEA for an sbt-based Scala + Spark project.
Create a jar file from an sbt-based Scala project using IntelliJ IDEA IDE
We know that the sbt is a project management tool that helps us to build and package our applications written in Scala or Java. Once, we create the .jar file, we can upload it to the edge/master node and then execute it using the spark-submit command. To create a jar file from a Scala project using the sbt build tool in IntelliJ IDEA, we need to follow the below steps:
- Create a sample sbt based scala hello-world-demo project in IntelliJ IDEA
- Add spark dependencies in the build.sbt file
- Add an Artifact with the main class
- Build the Scala application
- Test the created jar file
Now, let’s discuss each of the above points in detail:
1. Create a sample sbt based scala hello-world project in IntelliJ IDEA
To set up an sbt based hello-world-demo project, we can follow these steps:
- Firstly, download and install the IntelliJ IDEA community edition
- Secondly, install the Scala language plugin in IntelliJ IDEA CE
- Thirdly, create a sample hello-world sbt project
- Finally, Build and Run the project
To summarize, we need to create a hello-world-demo scala project using sbt and then we need to update the App.scala file with the below code.

package com.sqlrelease.demo

object App {
  def main(args: Array[String]): Unit = {
    println("Hello World!")
  }
}
The project structure looks like this.

2. Add spark dependencies in the build.sbt file
Next, we need to add the required dependencies for the Spark project in the build.sbt file. This file is used by the sbt compiler to build the sbt project with the required dependencies.
We can define the version of Scala and Spark in this file. The sample code for the build.sbt file looks as below:
name := "hello-world-demo"

version := "0.1"

scalaVersion := "2.11.12"

idePackagePrefix := Some("com.sqlrelease.demo")

// https://mvnrepository.com/artifact/org.scala-lang/scala-library
libraryDependencies += "org.scala-lang" % "scala-library" % "2.11.12"

// https://mvnrepository.com/artifact/org.apache.spark/spark-core
libraryDependencies += "org.apache.spark" %% "spark-core" % "3.2.1"

// https://mvnrepository.com/artifact/org.apache.spark/spark-sql
libraryDependencies += "org.apache.spark" %% "spark-sql" % "3.2.1" % "provided"

// https://mvnrepository.com/artifact/org.apache.spark/spark-hive
libraryDependencies += "org.apache.spark" %% "spark-hive" % "3.2.1" % "provided"
It is worth mentioning that we are using Scala 2.11.12 version and Spark 3.2.1 version in the build.sbt. The version compatibility is important, otherwise we can land up in some weird errors and exceptions while executing the jar file.
3. Add an Artifact with the main class
Now, we need to define the artifact for the main class in the IntelliJ IDEA IDE. The IntelliJ provides a very simple setup process to generate a fat/uber jar for an sbt project. We will be using this out-of-box method to generate the final jar file for this demo sbt project. We can use it to create a jar that can be placed on a Hadoop machine and then can be executed in a distributed environment. To add the artifact, we need to follow these steps:
- First, we need to go to File -> Project Structure
- Second, a dialog box will appear. Click on the Artifacts tab and then click on the + button to add a new jar artifact. Next, click on JAR -> From modules with dependencies…

- we need to choose the main class (App.scala) to generate the jar from the module hello-world-demo. Next, click on the “Ok” button. Also, please make sure that the “Directory for META-INF/MANIFEST.MF:” is pointing to the correct location. This path should be pointing to the “src/main” folder of the module hello-world-demo.

- The manifest file is used to recognize the main class by providing the full path of the main class in “package-name.class-name” format. The content of the MANIFEST.MF file looks like this.
Manifest-Version: 1.0
Main-Class: com.sqlrelease.demo.App

4. Build the Scala application
Once, we have set up the artifact successfully, we are good to build the jar artifact from the module. The JAR module then can be deployed to a Hadoop cluster and can be executed. To build the artifact, we can follow:
- Go to Build -> Build Artifacts…

- The Build Artifacts dialog box will appear. Choose the Build/Rebuild option appropriately.
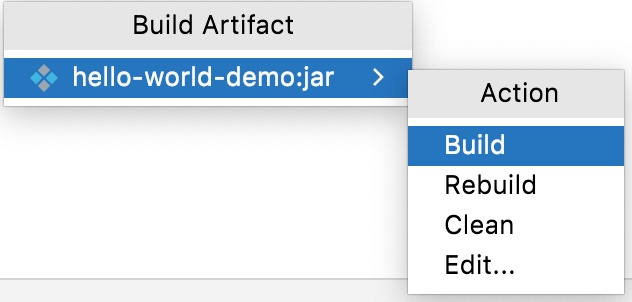
- Above, we have chosen the “Build” option to create a Fat/Uber jar from the hello-world-demo module. Once, the build is successful, we get a jar file created in the out folder as below.

5. Test the created jar file
Now, we have a Fat/Uber jar that has been created by the IntelliJ IDEA. To execute this jar file, we can use the below command in the IntelliJ IDE terminal window:
java -cp out/artifacts/hello_world_demo_jar/hello-world-demo.jar com.sqlrelease.demo.App
And this results the below output:

Thanks for the reading. Please share your inputs in the comment section of this post.
